 Application Page Links
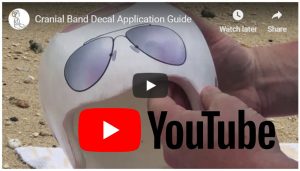
We have many YouTube application videos! We apply decals, paint, mod podge, and demonstrate specific techniques!
Step 0 – Preparing the surface. Are you painting your helmet? Here is our painting guide. We recommend waiting a full 24 hours after the last coat of paint before applying decals. Paint can feel dry to the touch in minutes but still be soft. Decals will lift soft paint. Otherwise, clean the outside of the baby helmet with rubbing alcohol. We included a small square of sandpaper your order. Sand your band everywhere you will apply decals. I need about 3-5 minutes to sand a band. You are not trying to remove plastic, just firmly roughen the surface. Some folks worry about weakening the band. You are not removing material. You won’t even feel plastic particles in your fingers.
Step 1 – cut the sheet of decals into separate pieces. Text is typically applied as a block, but if you can separate lines of text it will make applying each line easier. It helps to cut larger decals closely to minimize the excess transfer tape. The transfer tape does not flex as easily as the decal when bending around curvature.
Step 2 -map out where the biggest elements will go, or if layering, what goes down first. To help inspire you, we show reference designs for many decal sets. If you don’t see a reference design for yours, email us at [email protected] and ask us to create one.
Step 3 – Apply the decals. We have specific help for applying larger designs, goggles, and blocks of text.
These ideas work best:
Stick decals down starting at the center, and slowly work towards the edges. Watch for bubbles or creases. If you have a bubble or crease, see if it is possible to lift up the vinyl to release. If not, use a credit card or squeegee to work it out.
A vinyl decal may appear to be stuck down firmly with just your finger pressure, but if possible, it really needs more pressure to firmly bond. Mom started with fingers, and finished with a credit card to bed the vinyl.
We recommend using a squeegee. If you don’t have one a credit card works but it not as stiff as a squeegee so isn’t as effective. Credit cards can have sharp edges that damage the decals, so better than nothing but not really a substitute for a squeegee. Larger decals really need a squeegee to apply the pressure needed to get them to go flat.
Using the squeegee you can get fairly aggressive with the vinyl, as it is tough, so it is a much better tool than a credit card.
Step 4 – Pull back the transfer tape and slowly remove it. Don’t pull up on the transfer tape, pull back so that the tape is making a hairpin turn. Pulling up encourages the decals to lift with the tape.
Step 5 – With some designs it is clear were every element will go. With others, particularly flower designs, there is no set place for most elements. Generally we recommend placing large designs first, and then place smaller designs around the bigger designs to fill out the overall look of the band.
Step 6 – It is just fine for decals to overlap the edge of the band. Just trim off the extra. Trim carefully and you can use the trimmed off portion somewhere else.
Pro tips on cleaning a Mod Podge’d band
Your band looks fantastic! I have a page of tips from experienced parents on how to clean the band and eliminate band smells. Quick note – washing mod podge with high percentage rubbing alcohol can damage the protective coating and is not needed.
 Why do we recommend you apply Mod Podge?
The #1 enemy of vinyl decals is friction. Run your fingernail along the band until you get to the decal. Feel the edge? Keep pulling, and eventually you will get the edge of the decal to lift. Active children are rubbing their heads on bedding, rugs, and furniture, and fabric rubbing on the decals, over time, is just like your fingernail, pulling and tugging on the decal edges.
We have had very few reports of damaged decals from folks who followed the Mod Podge application instructions (and we have been able to find a solution for them at no cost to them).
Mod Podge is:
• Easy to apply
• Easy to remove (removal won’t damage decals)
• Hardly visible (most helmets in our picture gallery have it on)
• Protects decal points from breaking off
• Prevent the ink from sanding off
• Prevents the edges from lifting up
Customer feedback on using Mod Podge
We recommend you apply about five medium coats of “Mod Podge” as a sealer over the top of your decals and we have a Mod Podge application guide as mentioned above. You have enough Mod Podge thickness when your fingernail keeps sliding and does not catch on the decal edge.
Not every design and child needs this, but most of the time you won’t know until it is too late. Reapplication every few weeks may be needed with active children. We recommend two coats at the time of initial decal application, two more the next day during the time your child is not wearing the band, and one last coat the day after.
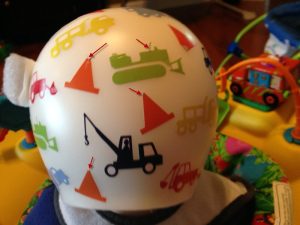
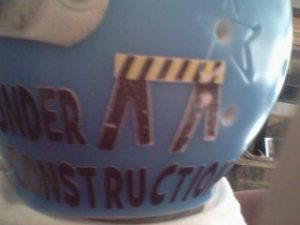
Designs and lettering with thin or pointy parts (like the name Paige above or see the pictures below) are prime candidates for Mod Podge, as just a little rubbing will lift or shift the thin lettering, break off corners, or can even rub the ink off.
Without Mod Podge, damage happens fastest with active children who move more, and the damage will usually happen first on the back of the helmet where the rubbing generally happens most. Damage to unprotected decals can happen from just a few days to a few months.
Decals on the back of active kid’s helmets need Mod Podge!
Decals on the back of active kid’s helmets need Mod Podge!
Mod Podge protects against rubbing the ink off. Mod Podge is great at addressing each of the issues – it reduces pulling at the edge of the decal, protects the top of the decal from wear, and helps lock small parts in place!
Mod Podge is very safe and Non-Toxic. Please use the brush on Mod Podge (matte finish) and NOT the aerosol Mod Podge, or outdoor Mod Podge.
We recommend you put two coats on per day, the first two right after you apply the decals and before your child wears the band, and two more the next day, and the final coat the day after. This should fit the one hour per day your child is allowed to be band-less.
You may want to reapply the Mod Podge every other week or as needed.
If you would like to change the design, Mod Podge is easy to remove when applied to the proper thickness. Lay a wet cloth on the mod podge for 3-5 minutes. Then it will pick off with your fingernails. Have running water available and it will help clear it off.


Can you take off mod podge easily and switch between sets off stickers I bought three sets off stickers
Hi, yes mod podge peels off in sheets. Start from the edges and it will lift off. Also it softens / dissolves in water so setting a wet towel on the outside will make it easy to wash off.
Any suggestions for solid black helmets. Boy themed??
Carina there are so many I think it would be easier to tell you those that would not work. Keep in mind, we adjust colors on almost all designs. Really the only design we don’t adjust colors on are ‘3D’ effect designs.
Do you have any designs to put on a starband clear helmet.or how would I do it
Samantha our decals are fine for putting on clear helmets.
Hello. I am looking for a NY jets themed helmet decals for my son.
Do you have anything like that?
Thank you!