Quick Links
How to apply the vinyl decals
How to apply heat transfers
How to apply googles or large decals
 Please do not paint a $3,000 band with 50 cent paint from Walmart. Many folks email inquiring about changing the underlying color of their child’s band. You can probably paint the band yourself! We have put together this guide to help parents paint their own cranial band helmet before applying the decals. These instructions apply no matter who’s paint you use.
We now offer painting kits! Click here to see the colors!
Our painting kits have everything you need to paint the cranial band – paint, paintbrush, and a sandpaper square.
Acrylic paint has the best reputation for durability. It is low in toxicity when wet, and even much less so after drying for an hour. It is possible to use water based latex paints but it may scratch a little easier.
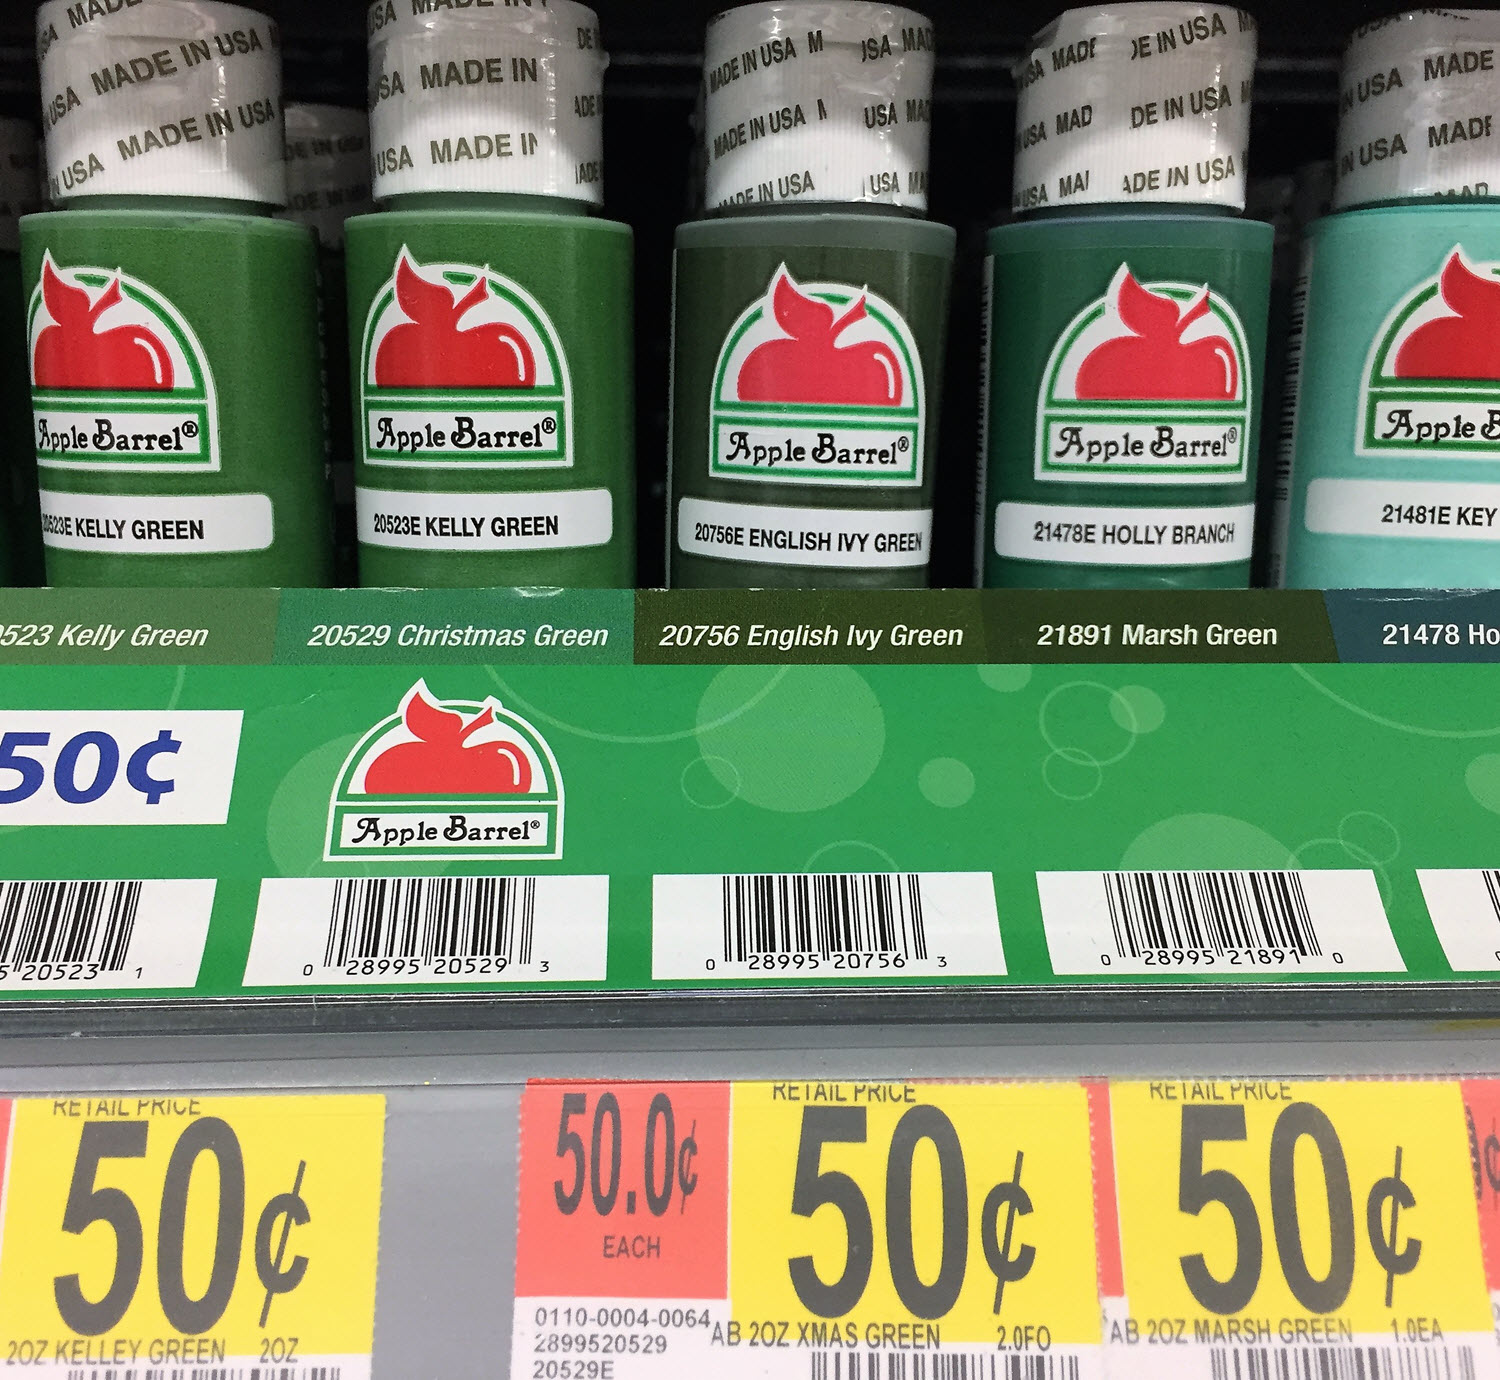
“Acrylic” is used in many paints. Typically you are looking for acrylic paint in a tube or small bottle. Some “acrylic” paint is sold in large bottles for a dollar or two and is very poor quality and meant for porous surfaces and kid crafts. This paint will peel right off a band.
You want good quality paint. Paint sold in smaller quantities and intended for artists is almost always going to be a good choice.
 Many store sells 1-oz bottles of acrylic paint. Some is good, some is not. Expect to pay at least $3-$4 (or more) for 1oz of good paint. Be wary of less expensive paint. We only sell a paint brand and color after we tested it ourselves for quality.
Less expensive paint has less pigment, the color quality is less, and worst, you are much more likely to have sticking issues.
Sadly you will notice the most expensive paint brands intended for artists usually do not come in light pink/light blue/light purple/grey. Quality paints are intended for artists. Artists mix their own paints to generate their desired range of colors.
 We have painted a band in every color we offer, and tested it for coverage and sticking power.
We highly, highly, highly recommend giving the outside of the band a light sanding. We include a square of sandpaper with the paint we sell. You are not trying to dig a hole to China, but you do want to firmly roughen the surface. You should press hard enough to feel some heat with your fingers. I take about 3-5 minutes of vigorous movement to sand a band. I rub in one direction (say up-down) and then the other (so switch to right-left).
 Don’t miss any part of the band surface that will be painted. Bands are generally very slick. Again, you are not trying to remove material, just don’t miss any part. Paint on any part not sanded might pull off with just the decal transfer tape.
The rough surface after sanding dramatically increases the sticking power of paint. Paint may easily flake, rub or scrape off of un-sanded bands.
People are tempted to cheat around the outside edges of the band and not really sand there, thinking it won’t really matter. Sand every bit of the painted surface! Properly sanding the band is the most important step of the process!
Band manufacturers specifically warn about sanding to the point where the helmet loses some rigidity. That won’t happen with 220 grit or above, and with just roughing the surface.
Good paint needs a good paint brush, but you don’t need to pay more for the brush than the paint. Avoid the $12 brushes and get a good but basic brush with nylon fibers. We get good and smooth brush strokes with this style. Expect to pay ~$4.
Touch the bristles on the brush. Are they soft, or are they hard? Brush manufacturers put starch in the bristles so they can shape them and not all that starch might have gotten washed out.
Soak the brush in a cup of hot water for 5-10 minutes and then wash the bristles and you will be good to go.
Stir/shake your paint. Different colors of paint have different coloring agents, and some will settle to the bottom of the bottle. The top of the bottle where you dip your brush will give runny, watery paint and the color coverage will be poor. A good stir will mix things up!
Now it is time to paint your cranial band. Generally two coats are going to be enough unless the color change is extreme. An hour between coats should be fine, or paint on sequential days. Do not use heat to speed the drying of the paint. You may use a blow dryer just on “blow” and not on heat.
Be careful to keep the paint on the outer shell and not the inside. Tape off the inside to ensure paint cannot accidentally get inside.
Painting might be the end result, or just a prep step before applying decals.
If painting is the end result, use an acrylic varnish to protect the paint from scrapes and dings. Varnish has been reported as much more durable than simple acrylic sealer.
Mom tip! If decals are the next step, we recommend you apply 1-2 coats of Mod Podge over the paint, and then apply the decals on the Mod Podge, Decals still need the recommended 5 coats of Mod Podge to protect them.
If the decals are applied directly on the paint, they will take paint with them if they are removed. By applying on the Mod Podge, you have a fighting chance to keep the paint job intact.
Either way, do expect some dings and scrapes to still show up on the paint. This in combination with the Mod Podge will protect the paint fairly well. Helmets just protected with varnish will still get some scratches and dings. Worst case, sand the varnish to roughen it, and paint again!
And this is how to paint a cranial band!
Time to move on to the decal application instructions?

Our customers have shown tremendous creativity in painting helmets. Anai sent me her pictures of the completed band and I had to complement her and ask how she did it.
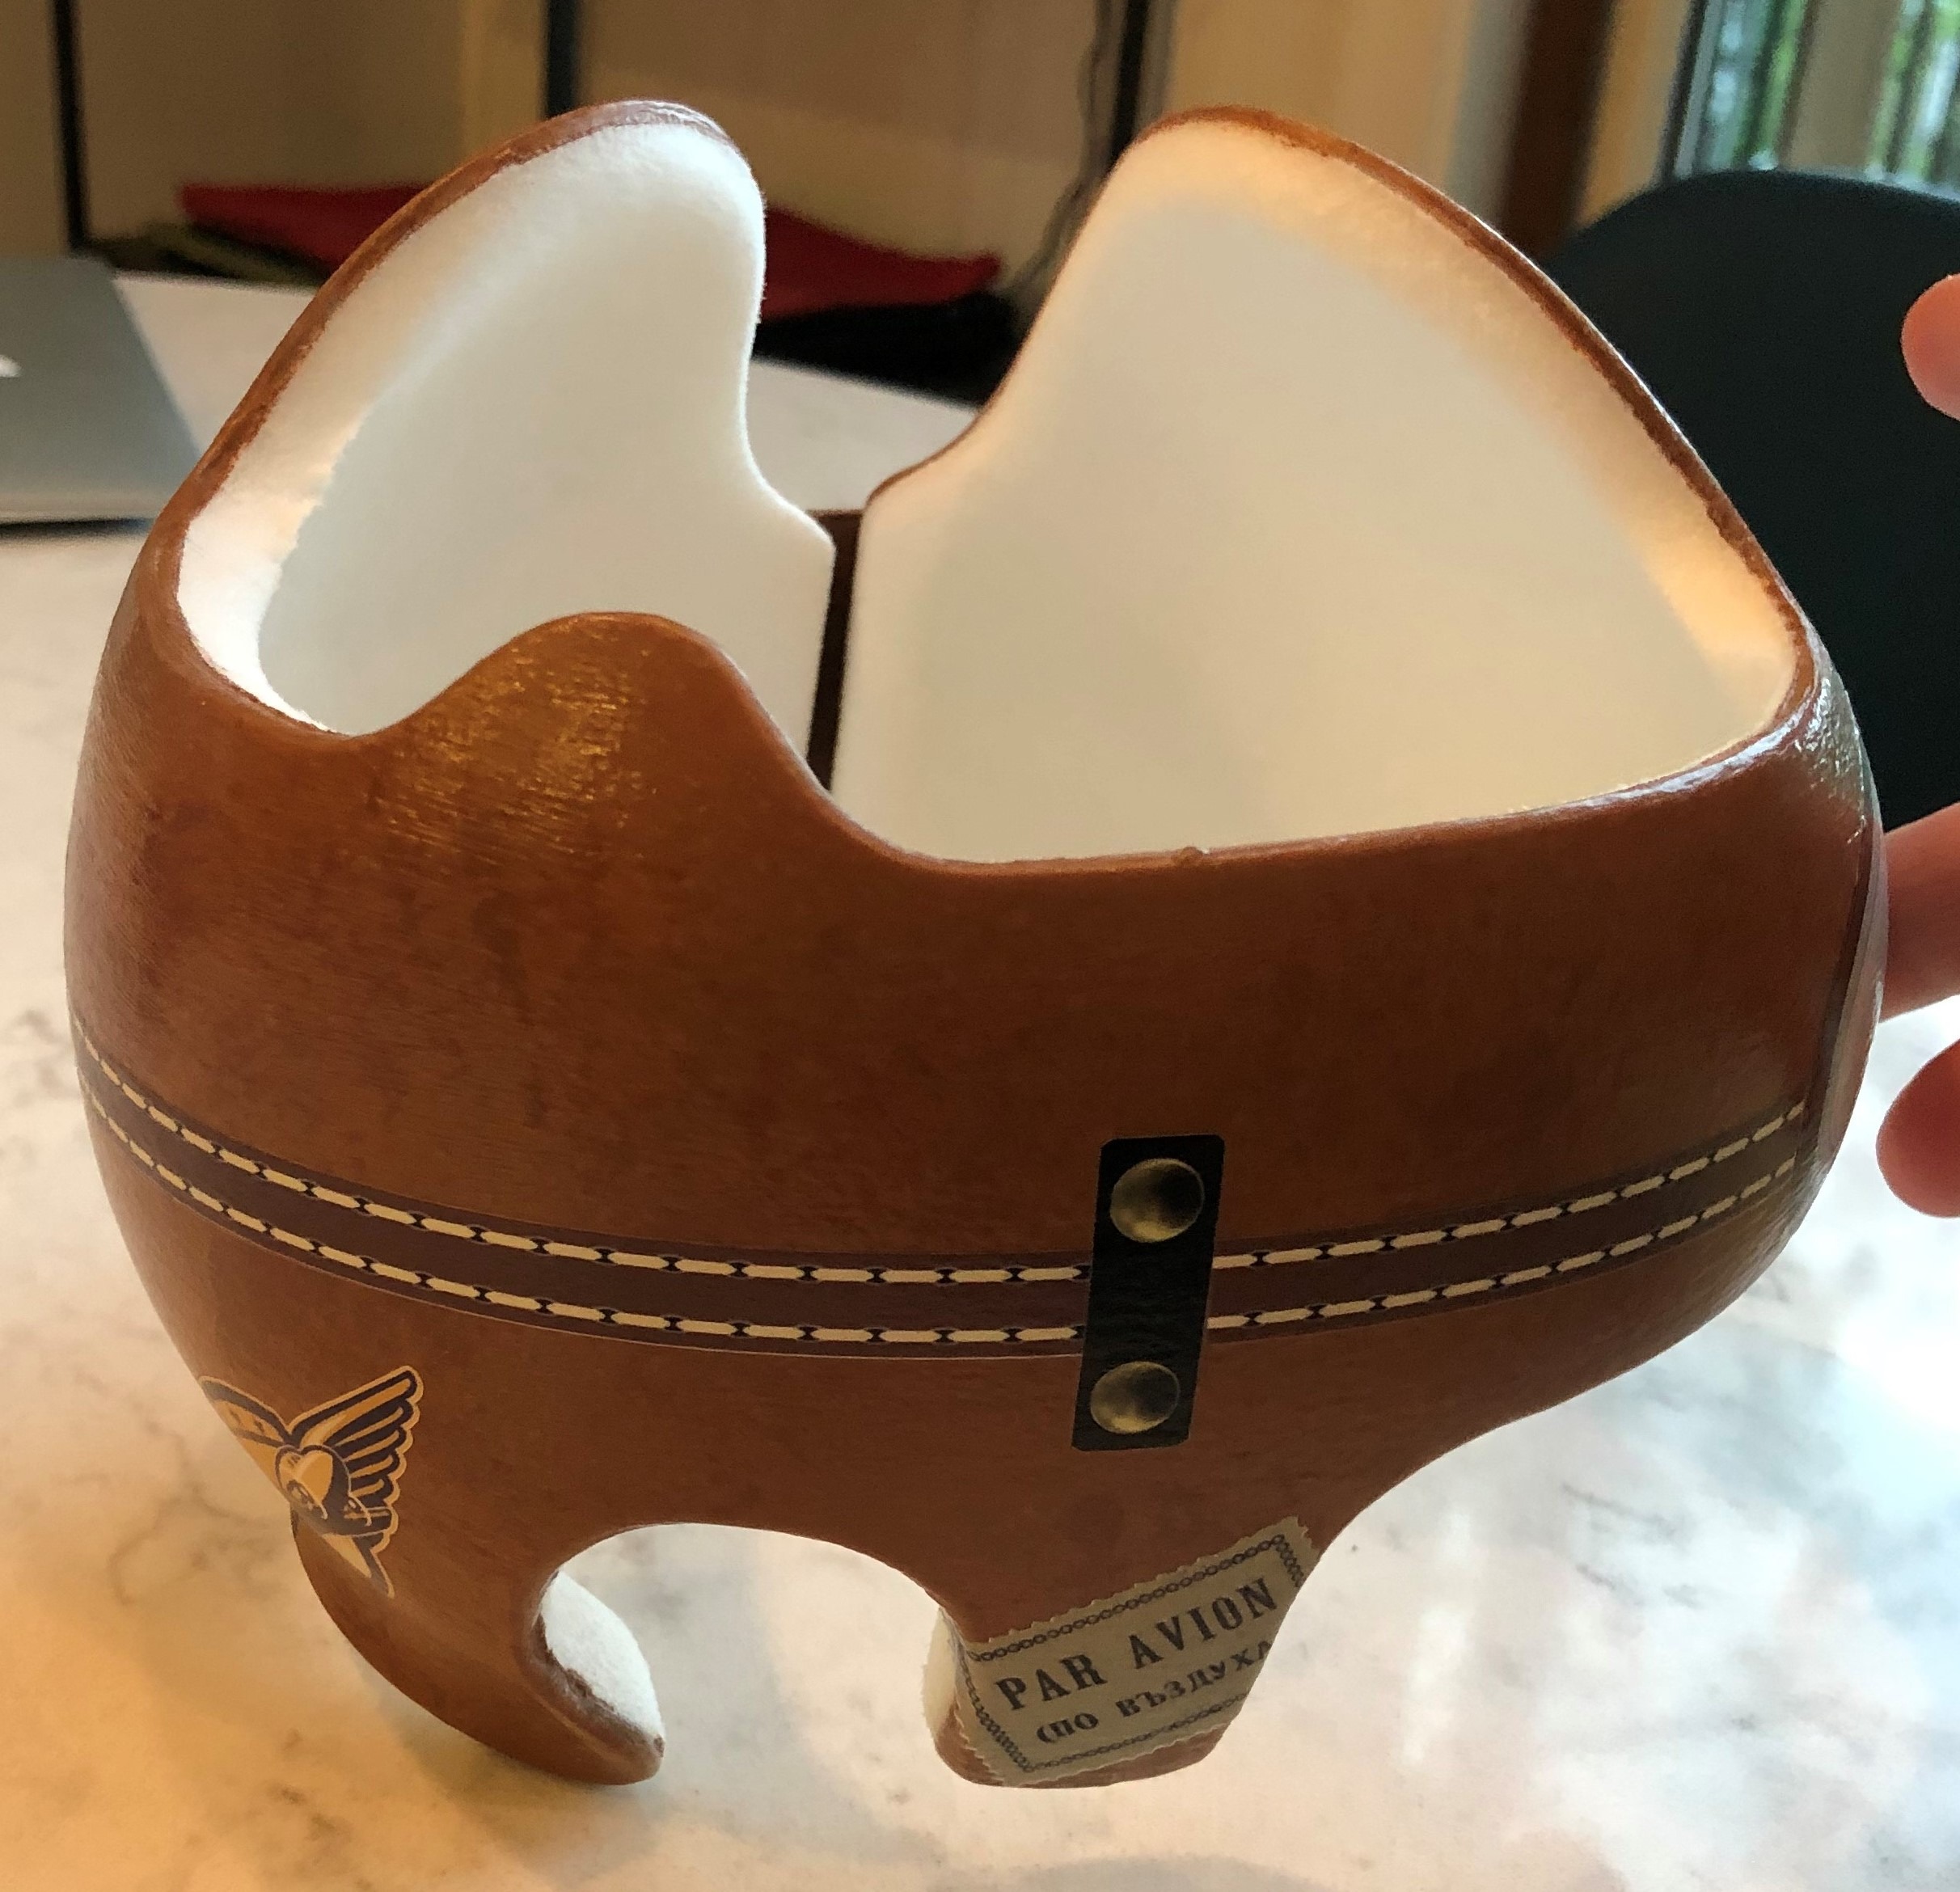 “Thank you! I did paint it myself 🙂 It’s actually incredibly easy to get the leather look. I used 2 tones of brown, specifically Raw Siena and Dark Chocolate from Americana brand acrylic paints. You put on 2 coats of the light brown, let dry fully. Then you crumble up a plastic supermarket bag and brush a thin coat of the dark brown paint on the bag. Make sure not to have too much and that it’s not dripping.
Lightly dab the crumbled up bag (holding it like a ball in your hand) around the helmet. Its important not to press too hard. Wait 30 minutes. You’ll pour about 2 tablespoons of acrylic varnish (matte works best) into a paint dish and add a few drops of the Dark Chocolate paint to tint it. With a small foam roller coat the helmet with the varnish. One layer should do it. That’s it! Faux Leather. Someone could do it over 2 days during the hour off.”
Last, I used to pass along a customer who went to an auto body paint shop and they painted her band. Before I knew much about paint, I thought paint was paint was paint.
But paint isn’t paint isn’t paint. Automotive paint is made with VOCs – volatile organic compounds – and solvents known to cause damage to people.
Most likely when the paint is dry, automotive paint is inert. But how much time till it is dry? While paint seems dry to the touch in minutes, often paint needs days (or more) to truly dry.
I now recommend you stay away from automotive paint shops, as fantastic as the results look. I recommend you only use acrylic paint with the AP or CL label.
Can you tell me what acrylic paint brands are preferred/recommended? I am not too familiar with arts and crafts products thank you
Hi Brianda,
There are too many brands and variations to recommend one with absolute confidance. However, you want acrylic paint that comes in the metal tube. A lot of large containers of crappy paint now say “acrlic” on the bottle and you will get poor results with that. You want real acrylic artist paint.
Does the mod podge substitute the acrylic varnish?
Hi Jenn, it really does not. Acrylic varnish will still leave an ‘edge’ on the decal that can catch on bedding and clothing. Over time things pulling on the decal edge can lift the edges or break the points off.
Mod Podge builds up in thickness so that things slide over the decals.
If I paint the helmet and seal it with Mog Podge, can I apply your decals and remove them without disturbing the paint?
Hi Amy, that is correct and that is how I recommend folks protect their paint jobs. 2 coats of mod podge over the paint should do it.